Friday, December 26, 2008
Christmas Gifts
I was very happy that my mom really loved the quilt that I made her for Christmas. She loved it so much that she cried when she opened it, and of course that made me cry too. My Aunt also loved her pillow :)
Tuesday, December 23, 2008
Last Minute Christmas Gift
I could not think of what to get my aunt for Christmas but I finally had an idea to make her a quilted pillow on Sunday evening. I have wanted to so something based on the four seasons for a while. That theme worked well for this pillow based on a double four patch square.

Here is the pillow top quilted with the basting stitches removed


Here is the spring square with quilting around the birds 
This is the fall square with quilting around two leaves

This is the summer square with leaves quilted on the green field (chalk marks visible)
 Here is the finished pillow sham from the front...

...and the back. I just doubled the fabric and positioned it to overlap about 3 inches to allow the pillow form to be inserted and removed for washing. I then sewed the wrong sides of the pillow top and back together and turned it right side out.

The finished pillow.
I am very happy with how this turned out :) This is what I love so much about quilting and other hand crafts, the finished product. I hope my aunt likes it.

Here is the basted "quilt sandwich" prior to quilting
Here is the pillow top quilted with the basting stitches removed
Here is the winter square with a snowflake quilted on a blue field

Here is the spring square with quilting around the birds

This is the fall square with quilting around two leaves

This is the summer square with leaves quilted on the green field (chalk marks visible)
 Here is the finished pillow sham from the front...
...and the back. I just doubled the fabric and positioned it to overlap about 3 inches to allow the pillow form to be inserted and removed for washing. I then sewed the wrong sides of the pillow top and back together and turned it right side out.
The finished pillow.
I am very happy with how this turned out :) This is what I love so much about quilting and other hand crafts, the finished product. I hope my aunt likes it.
Tuesday, December 16, 2008
Almost Finished!
I am almost finished with the lap quilt I am making for my Mom. I basted the edge of the quilt to bind it.


I then used a hem stitch to bind the edge and mitre the corners.
Then I quilted along the bound edge.
I removed the basting stitches and here it is, almost ready to give my Mom for Christmas!
I still need to remove the quilting line marks from the red chalk pencil.
Friday, November 28, 2008
Preparing to Quilt
I took apart my niece's wall hanging and sewed it together straight (or at least straighter!). Then I placed it on some thin cotton quilt batting with at least 3"-4" of batting extending beyond the edge of the quilt top.

Then I cut the batting so that there is a even 3"-4" border of the batting around the quilt top.

Next I placed it on the fabric I want to use for my backing with the backing fabric extending at least an inch beyond the edge of the batting. The backing fabric is face up. I like to select the same fabric for the backing and the stripping.

Then I baste the three layers of the quilt top, batting, and backing fabric, together using contrasting thread. I baste it to stabilize it for quilting.

Here is a closer view of the basting stitches...

...and the back of the "quilt sandwich".

Then I cut the batting so that there is a even 3"-4" border of the batting around the quilt top.
Next I placed it on the fabric I want to use for my backing with the backing fabric extending at least an inch beyond the edge of the batting. The backing fabric is face up. I like to select the same fabric for the backing and the stripping.
Then I baste the three layers of the quilt top, batting, and backing fabric, together using contrasting thread. I baste it to stabilize it for quilting.
Here is a closer view of the basting stitches...
...and the back of the "quilt sandwich".
Wednesday, November 26, 2008
Crooked!
I finished all four blocks for my niece's quilted wall hanging. So, I sewed the stripping on using my machine. Unfortunately it turned out a bit crooked, so I'll need to take it apart to get it straight. Even though it is crooked now, I still think it turned out cute.

Thursday, November 20, 2008
Prepping for Applique
In order to stiffen the fabric to applique it, I ironed freezer paper with the waxed side down on to the outer edges of the fabric pieces.
Here are the applique pieces for Grandmother's Fan.

It will look something like this when finished with the addition of some lace at the edge of the fan.

Here are the applique pieces for Dresden Plate.

It will look something like this when finished.

Tuesday, November 18, 2008
Dresden Plate
I haven't finished the Grandmother's Fan block yet because I need to get some freezer paper to stiffen the fan to applique it, so I have moved on to the next and final block. The next block for my niece's wall hanging is Dresden Plate. It is also an applique block and the background and center will also be the Pooh fabric.

Thursday, November 6, 2008
Starting Grandmother's Fan
I started the block "Grandmother's fan" tonight for my niece's quilted wall hanging. It is an applique block and the background fabric will be Pooh.

Wednesday, November 5, 2008
Mexican Star Completed
I have been working on the Mexican Star block for my niece the past several days and taking pictures of the various stages.


Completed Mexican Star block

Tuesday, October 28, 2008
Mexican Star Deconstructed
The next block for my sweet niece's wall hanging is called Mexican Star.
Step 1. I trace the pattern pieces from the pattern book onto some thin plastic.

Step 2. Trace the pattern pieces onto the fabric.


Step 3. Mark a 1/4" seam allowance using the quilting stick.

I then cut out all of the pieces. Here they are arranged in their final position. The angles are off because of the seam allowance. When I sew it together the corners will meet. I fussy cut Pooh so he would be right side up.

Thursday, October 23, 2008
Bright Hopes Completed
Here is the completed "bright hopes" block for my niece's wall hanging. I am really happy with how it turned out.

Monday, October 20, 2008
Lap Quilt
This is the other project I have been working on. It is a 12 block sampler lap quilt for my mother. It is all hand pieced and hand quilted (at least the part that I have finished quilting). It still needs some quilting completed and the edges bound. I hope to finish it for Christmas...we'll see.


Grandmother's Fan

Jacob's Ladder
Dutchman's Puzzle

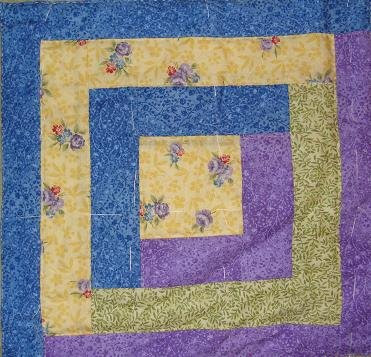
Log Cabin
Drunkard's Path

Honey Bee (one of my favorites)

Dresden Plate

54-40 or Fight

Rail Fence

King's X

Ohio Star

Card Trick

Subscribe to:
Posts (Atom)